

How To Draw Anime Girl With A Baseball Hat
This twelve pace tutorial shows how to depict a girl in a cartoon style. It includes detailed illustrated examples along with proportions and drawing instructions.
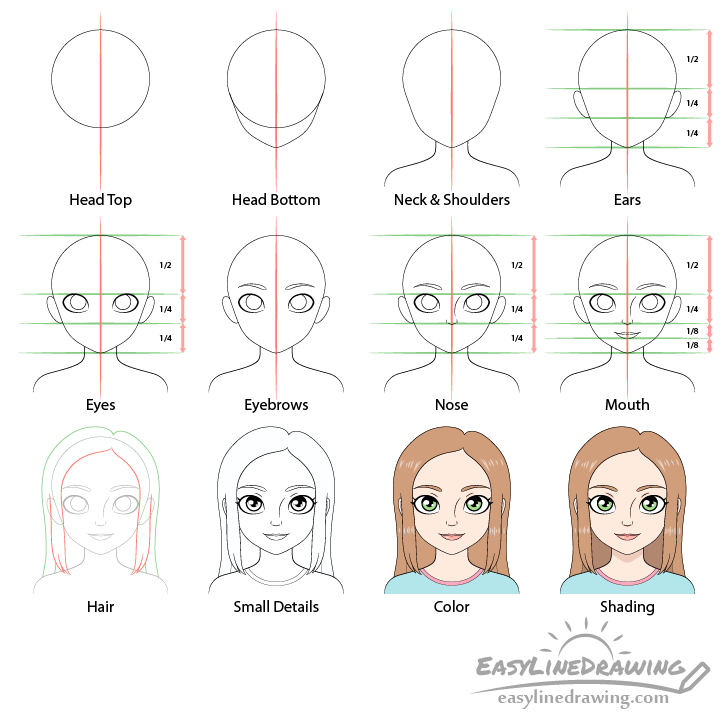
Drawing people (even in a simplified drawing style) can be a flake of a claiming. To make things easier this tutorial breaks up the cartoon into 12 stages that evidence how to describe and identify the different parts of the head and face.
Equally the character in the examples has quite a bit of details this tutorial is longer and more detailed than most other ones hither on EasyLineDrawing. It should nevertheless however be fairly piece of cake to follow and sympathise even for beginners.
If drawing on newspaper y'all should definitely start with a pencil every bit you will demand to erase certain parts of the character in between the different steps. To make erasing easier you should besides brand fairly light lines. The lines in the examples dark just so that they are easier to run across. You can darken your lines when you lot are nigh washed with the drawing.
Step 1 – Draw the Peak of the Head
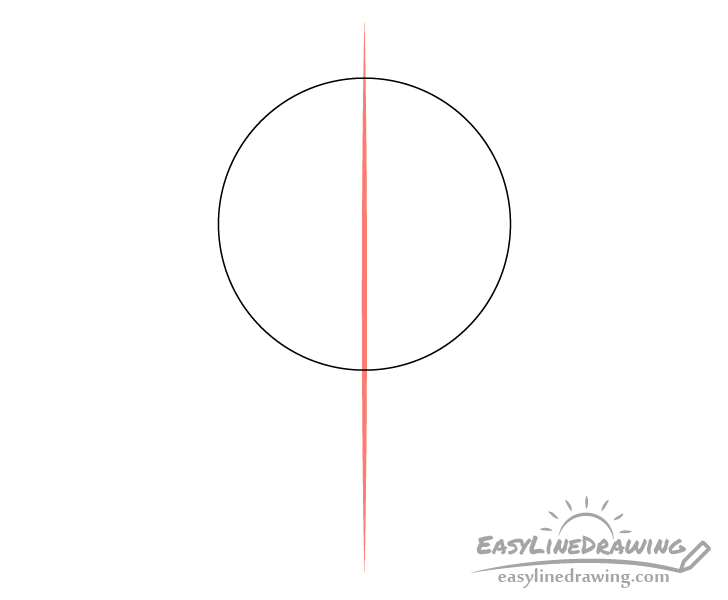
Before drawing whatever parts of the caput or face up it tin exist helpful to draw a straight vertical line through the eye of your page/cartoon area. This line can act as a guide to help you run into if both sides of the head/face are fifty-fifty in width. It tin can besides help y'all heart the drawing on folio.
Towards the upper terminate of the line draw a circle that will correspond the pinnacle of the head. Be conscientious not to depict it too high upwards though as yous will demand to exit some room for the pilus.
Stride 2 – Draw the Bottom of the Face
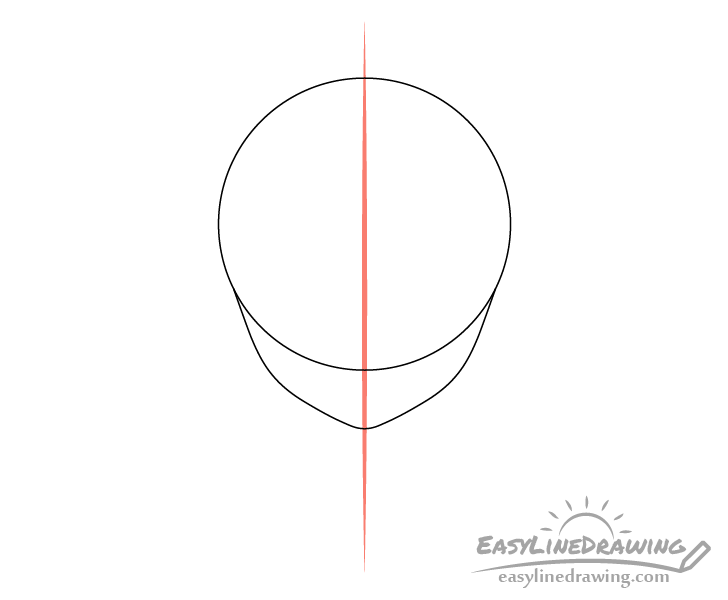
Going downward from the circle that represents the pinnacle of the head describe the bottom of the face up similar to what is shown in the instance. As this is a stylized cartoon character this part of the face up will be drawn smaller than in real people with a pointier chin.
Erase the bottom office of the circle after y'all are done then that the head looks like the example in the next step.
Pace three – Draw the Neck/Shoulders
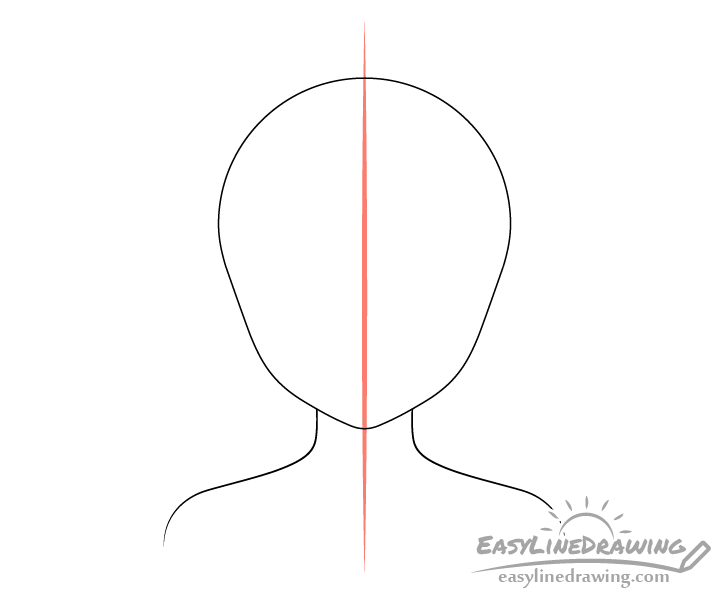
While this tutorial focuses on drawing the caput/confront it'southward a good idea to add together some of the trunk or else your drawing will just look odd.
Going downwardly from the bottom of the head add the neck and a fleck of the shoulders. Again, as this is a stylized grapheme brand the neck adequately thin in comparison to the head. You can make the shoulders fairly pocket-sized in relation to the head as well (when compared to the proportions of real people).
Step 4 – Draw the Ears

To identify the ears draw them with their tops close the the horizontal halfway indicate of the caput and their bottoms halfway between that and the chin as shown in the example to a higher place.
You lot don't have to draw all of the guide lines simply it'south a practiced idea to add the line that divides the face in half horizontally (you can estimate the rest). You likewise don't need to draw whatsoever of the inner details of the ears (at this stage) equally most of them will exist covered by the hair (added in later steps).
Step v – Draw the Eyes
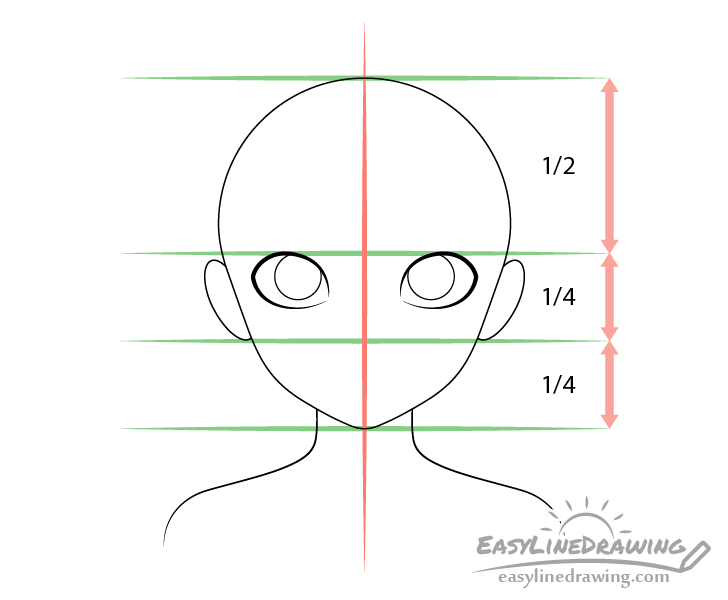
Draw the eyes beneath the horizontal halfway signal of the head similar to the ears. As this is a cartoon character where you describe the bottom of the optics can depend on how large y'all want them to be.
Angle the eyes slightly downwards towards the middle of the head.
Draw the irises with their tops slightly covered by the upper eyelids otherwise the eyes will look like they surface area staring.
Pace 6 – Draw the Eyebrows
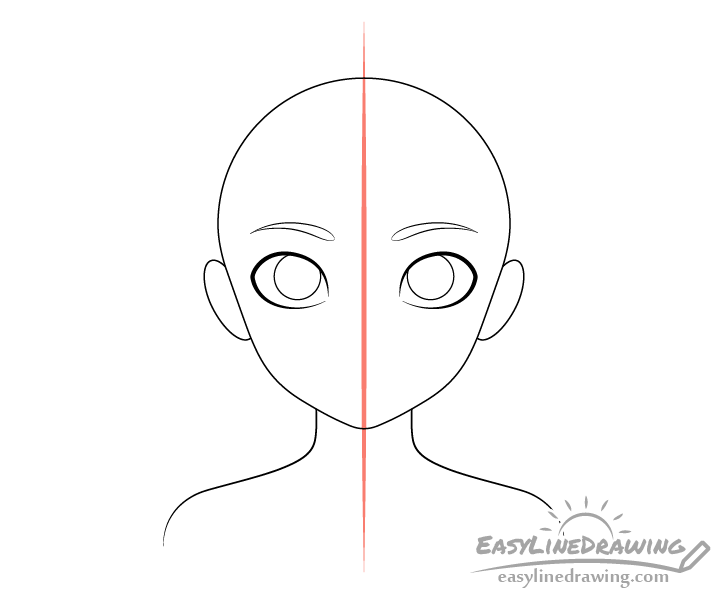
Draw the eyebrows a trivial manner up from the eyes. Make them thicker towards the middle of the face and narrower towards the ears. You can also position them slightly closer to the middle of the face as well.
Step 7 – Draw the Olfactory organ
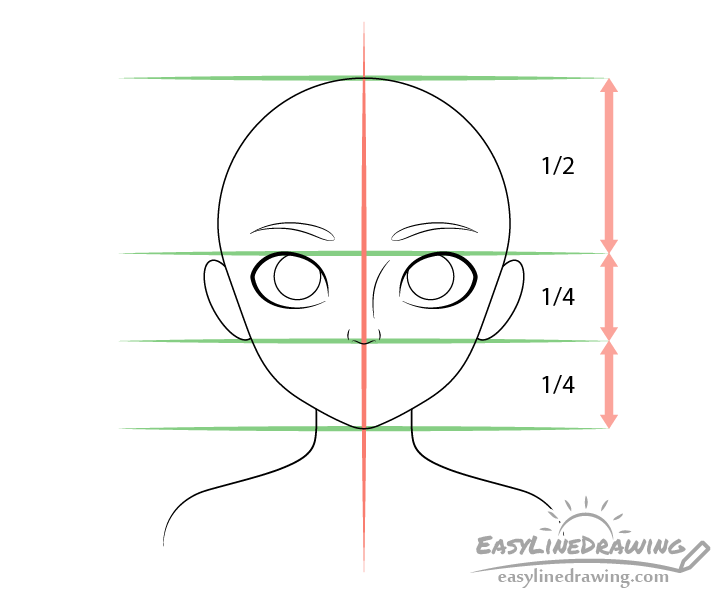
To draw the olfactory organ position information technology with information technology's bottom halfway between the elevation of the eyes and the bottom of the chin.
Yous tin show the tip/bottom of the nose with only one wavy line. Next draw each of the sides with just one small curve.
Finally draw just a hint of the bridge of the nose with 1 long bend going from information technology's lesser portion up towards the eyebrows.
Don't draw the other side of the bridge or the olfactory organ will look odd.
Pace 8 – Describe the Mouth
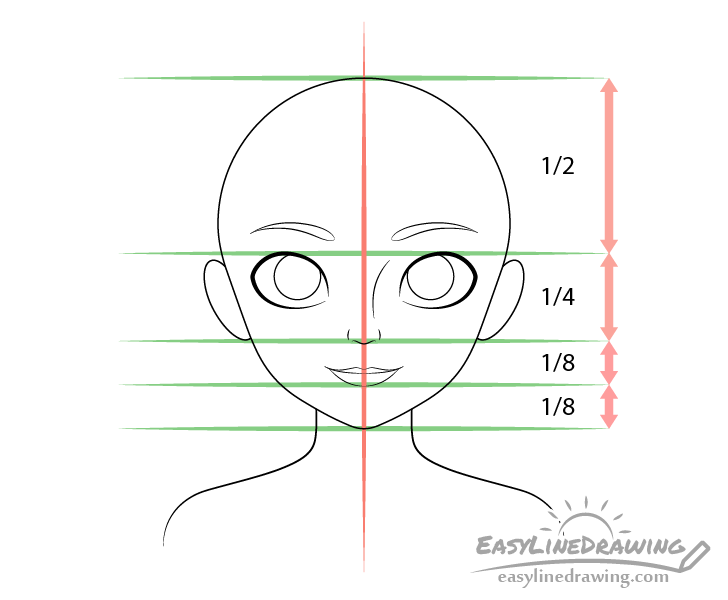
To finish placing the facial features depict the mouth. Position the mouth with the bottom lip between the bottom of the olfactory organ and the bottom of the chin.
In this example the oral fissure will exist drawn with a light smile so it will be slightly wider than it would be in it'southward natural state. It'southward entire shape volition likewise be curved slightly upwards.
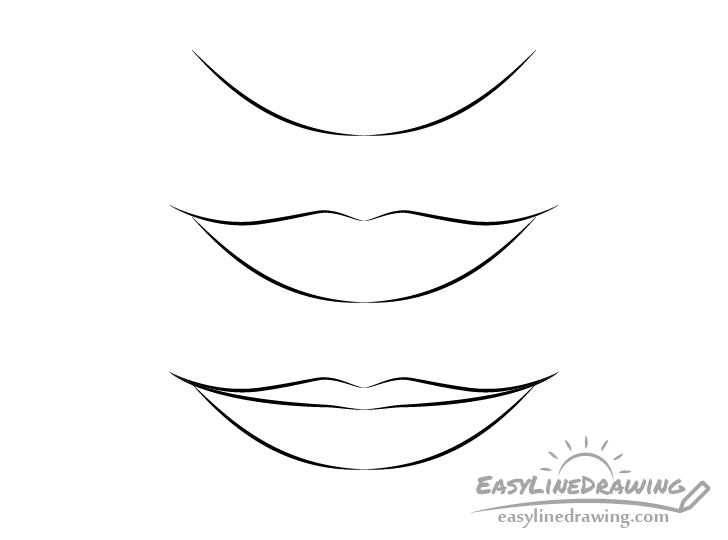
Draw the bottom lip as pretty much 1 big curve (or two curves joined together) and the upper lip shaped like a flattened letter "Grand". Draw the mouth (area betwixt them) every bit a curve too.
After finishing this step yous can erase whatever of the guide lines you used for placing the facial features.
For another example of drawing lips also see:
How to Draw Lips Step past Pace
Step nine – Describe the Pilus
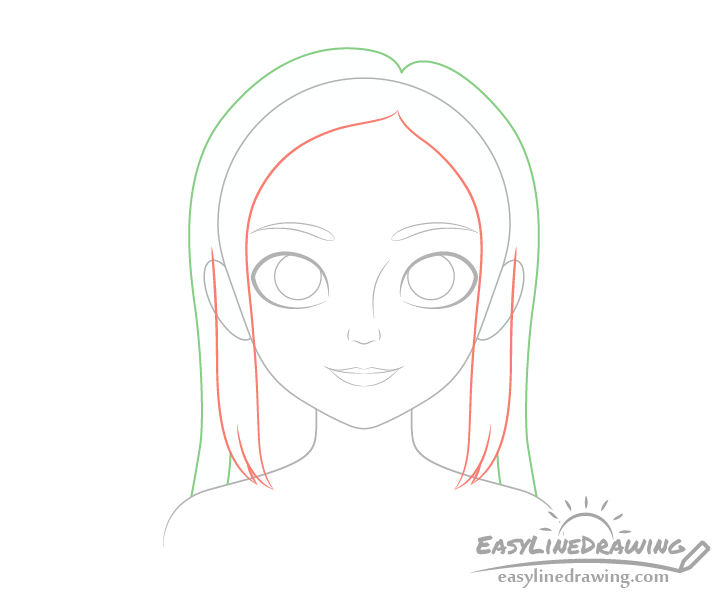
When drawing this item pilus style you lot can recall of it as carve up into ii parts. The forepart/sides (shown in red) and the dorsum (shown in green).
Draw the front department start and so add the back section afterwards.
When you are done outlining the hair you can erase the parts of the face that are covered by it.
In instance you are wondering why you had to depict the parts of the head covered by the pilus information technology's to aid avert making mistakes. Information technology's much easier to judge the volume of the hair and to place the ears if you tin see the unabridged head.
Stride 10 – Finished Line Drawing
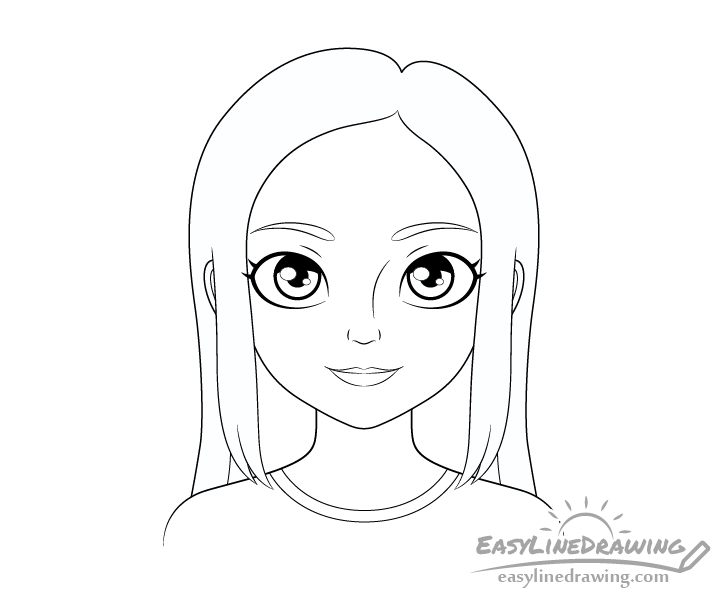
At this stage become over your drawing with darker lines and add the smaller details of the facial features likewise equally a hint of clothing.
For the details of the eyes do the following:
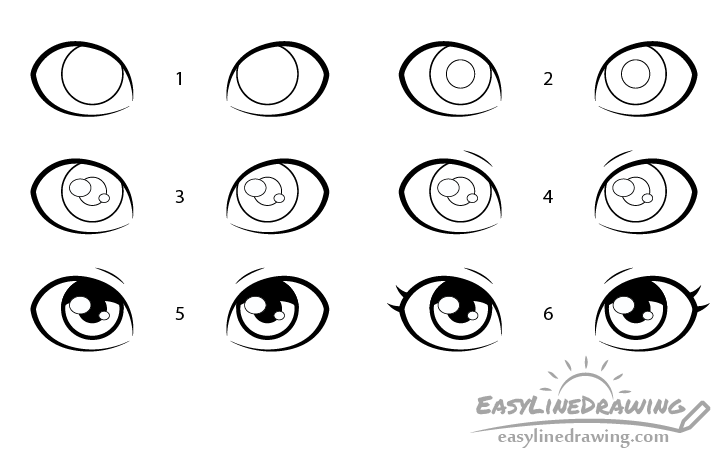
- Draw the basic shape of the optics and irises (should already be done from earlier step)
- Add the pupils
- Draw the highlights (low-cal reflections in the eyes) overlapping parts of the pupil and erase the parts they overlap (make the outlines of these barely visible then that they later blend into the color)
- Add together a hint of the eyelids
- Fill in the pupils with black (or shade them in with a pencil) and add a dark/black area above them equally shown in the instance
- Add some eyelashes
For drawing different kinds of eye expressions in this aforementioned style come across:
How to Depict Heart Expressions Footstep past Step
For the other details add:
- A hint of the inner details of the ears
- The habiliment (just a bit of the shirt in this case)
Footstep 11 – Colour the Drawing
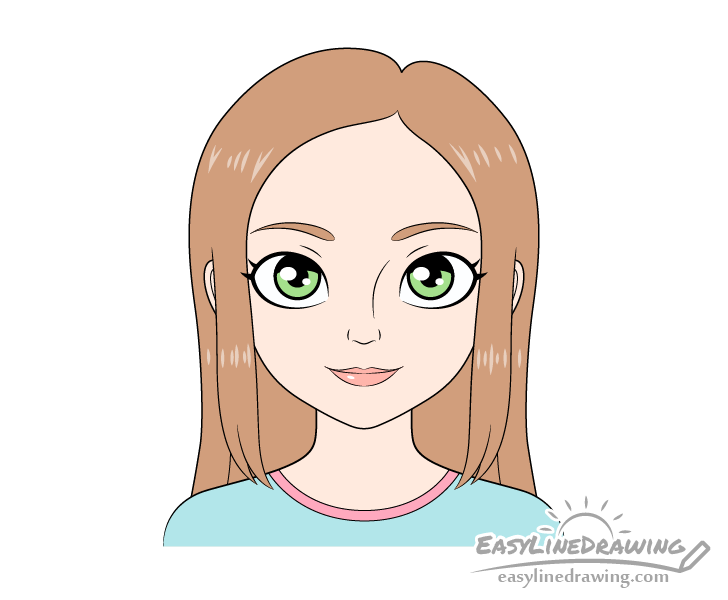
While the drawing in the example is colored digitally an easy mode to color a drawing like this i on paper is with colored pencils. Markers may exist too vivid and paints can smudge when trying to fill in the smaller details of the face.
You can pretty much apply any combination of colors that you like simply in the example information technology'south done equally follows:
- Brown pilus
- Light-green optics
- Pink lips
- Bluish/pink shirt
You will also notice there are some highlights in her hair. You tin add these by simply coloring around them so lightly shading over them with the aforementioned color as the pilus (so that they are not too bright).
There is also a tiny highlight on the lips that y'all tin can add by coloring around it also.
Step 12 – Add Some Shadows & Finish the Girl Drawing

To make the cartoon look a footling less "flat" you can add some very bones shading by darkening some areas of the drawing. You can either do this past going over parts of the colored areas with a regular pencil or by using a darker shade of whatsoever color you chose.
Generally the way shadows announced on anything is based on the lighting. To keep things simple the face up of this girl will exist shaded equally though she is either outside on a sunny day or indoors in a well lit room.
Add the shading in the following places:
- Pocket-size shadows around the eyelid areas
- Shadow in the inner parts of of the ears (barely visible)
- Tiny shadow below the nose
- Shadow on the entire upper lip (make the whole thing darker)
- Large shadow on the neck (case by the caput) shaped like to the mentum
- Large shadow on the pilus in the area betwixt the sideburns pilus and the neck
Decision
Cartoon people (even in a cartoon style) can be fairly difficult. You tin can however simplify the procedure by using the right cartoon approach. This means starting with the larger parts of the head/face and working down to the smaller details. It's also a good idea to use at least some bones guide lines (such equally the vertical line in footstep 1) and to keep in mind the proportions of the graphic symbol you lot are drawing. By doing then you tin minimize your mistakes and make the drawing procedure more manageable and easier to empathize.
For more similar tutorials see:
- How to Draw a Cat Step by Step
- How to Draw a Hot Dog Step past Stride
- How to Draw a T-Shirt Step by Footstep

Source: https://www.easylinedrawing.com/how-to-draw-a-girl-step-by-step/
Posted by: carsonadvit1993.blogspot.com
0 Response to "How To Draw Anime Girl With A Baseball Hat"
Post a Comment